Advanced on page SEO made simple.
Powered by POP Rank Engine™
Includes AI Writer
7-day refund guarantee
Schema markup, or structured data, is a powerful SEO tool that can enhance how search engines understand and present your website content in search results. By implementing schema markup, you can create rich snippets that stand out, attract more clicks, and provide valuable information to users directly within search results. While the idea of adding schema markup might seem daunting, it's actually a straightforward process that can be done with the right tools and knowledge. In this blog, we'll walk you through the steps to add schema markup to your website easily.
Which is the best LLM for SEO content?
Get the full rankings & analysis from our study of the 10 best LLM for SEO Content Writing in 2026 FREE!
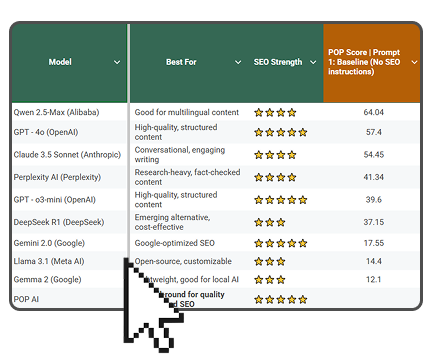
- Get the complete Gsheet report from our study
- Includes ChatGPT, Gemini, DeepSeek, Claude, Perplexity, Llama & more
- Includes ratings for all on-page SEO factors
- See how the LLM you use stacks up
What is Schema Markup?
Schema markup is a form of microdata that you can add to your website's HTML code to help search engines understand the content on your pages. Created by a collaborative effort from major search engines like Google, Bing, Yahoo, and Yandex, schema markup provides a standardized vocabulary that search engines use to interpret your content. This leads to better search visibility and the possibility of rich snippets in the search engine results pages (SERPs).
Why is Schema Markup Important?
- Enhanced Visibility in SERPs: Rich snippets created by schema markup make your listings more attractive and informative.
- Improved Click-Through Rates (CTR): Better visibility and informative snippets lead to higher CTR.
- Better Search Engine Understanding: Schema markup helps search engines accurately categorize and index your content.
- Voice Search Optimization: Structured data is crucial for voice search, making your content more accessible via digital assistants.
Which is the best LLM for SEO content?
Get the full rankings & analysis from our study of the 10 best LLM for SEO Content Writing in 2026 FREE!
- Get the complete Gsheet report from our study
- Includes ChatGPT, Gemini, DeepSeek, Claude, Perplexity, Llama & more
- Includes ratings for all on-page SEO factors
- See how the LLM you use stacks up
Steps to Add Schema Markup to Your Website
Step 1: Choose the Right Schema Type
Before you start adding schema markup, identify the type of content on your page and choose the appropriate schema type. Common schema types include:
- Article: For blog posts and news articles.
- Local Business: For local businesses to provide detailed information.
- Product: For e-commerce sites to showcase product details.
- Recipe: For food blogs and recipe sites.
- Event: For listing events with dates, locations, and descriptions.
- Visit Schema.org to explore the full list of schema types and their properties.
Step 2: Use a Schema Markup Generator
Schema markup generators make it easy to create structured data without manually coding it. Some popular tools include:
- Google's Structured Data Markup Helper: A user-friendly tool that helps you create schema markup for different types of content.
- Merkle's Schema Markup Generator: Offers a range of schema types and generates JSON-LD code.
- Schema App: A comprehensive tool for creating and managing schema markup.
- Using Google’s Structured Data Markup Helper
- Go to the Helper: Visit the Structured Data Markup Helper.
- Select the Data Type: Choose the type of data you want to markup (e.g., Articles, Local Businesses).
- Enter the URL or HTML: Enter the URL of the page you want to markup or paste the HTML code.
- Tag the Data: Highlight the text on the page and assign it to the appropriate schema categories (e.g., Title, Author, Date).
- Create HTML: Click on "Create HTML" to generate the schema markup.
- Add the Markup to Your Site: Download the generated HTML and add it to your webpage’s code.
Step 3: Add Schema Markup to Your Website
Once you have your schema markup code, you need to add it to your website. There are several ways to do this:
Using JSON-LD
JSON-LD (JavaScript Object Notation for Linked Data) is the recommended format by Google due to its simplicity and ease of implementation. You can add JSON-LD schema markup directly into the HTML of your webpage, typically within the <head> section.
Example of JSON-LD for an Article:
html
Copy code
<script type="application/ld+json">
{
"@context": "https://schema.org",
"@type": "Article",
"headline": "How to Add Schema Markup to Your Website Easily",
"author": {
"@type": "Person",
"name": "John Doe"
},
"datePublished": "2024-05-20",
"description": "A comprehensive guide to adding schema markup to your website easily."
}
</script>
Using WordPress Plugins
If you’re using WordPress, there are plugins that simplify the process of adding schema markup:
- Yoast SEO: Automatically adds schema markup to your pages. It also offers options for more advanced schema implementations.
- Schema & Structured Data for WP & AMP: A flexible plugin that supports various schema types and lets you customize your structured data.
Using Google Tag Manager
Google Tag Manager (GTM) is another way to add schema markup without directly modifying your website's HTML:
- Create a New Tag: In GTM, create a new tag and select "Custom HTML."
- Add the JSON-LD Code: Paste your JSON-LD schema markup into the custom HTML tag.
- Set the Trigger: Define the trigger to specify which pages the schema should be added to.
- Publish: Save and publish your changes in GTM.
Step 4: Test Your Schema Markup
Before deploying your schema markup, it’s crucial to test it to ensure it’s correctly implemented. Use the following tools:
- Google’s Rich Results Test: This tool checks if your page supports rich results and highlights any errors in your markup.
- Schema Markup Validator: Validates your structured data against schema.org specifications.
Step 5: Monitor and Optimize
After adding schema markup to your website, it’s important to monitor its performance and make adjustments as needed. Use tools like Google Search Console to track how your schema markup is impacting your search performance. Look for improvements in click-through rates, rankings, and overall traffic. If necessary, refine your markup to optimize its effectiveness.
Best Practices for Adding Schema Markup
- Keep it Relevant: Ensure that the schema markup you add is relevant to the content on the page.
- Use JSON-LD: Preferred by Google, JSON-LD is easier to implement and maintain.
- Be Comprehensive: Include as many relevant properties as possible to provide detailed information.
- Stay Updated: Schema.org is continually updated with new schema types and properties. Keep your markup up to date with the latest standards.
- Avoid Overloading: Don’t overdo it with multiple schema types on a single page. Keep it focused and relevant.
Common Mistakes to Avoid
- Incorrect Implementation: Ensure that the schema markup is correctly added to your HTML and doesn’t contain errors.
- Mismatched Data: The data in your schema markup should match the visible content on your page.
- Ignoring Testing: Always test your schema markup before deploying it live to catch and fix any errors.
- Neglecting Updates: Regularly update your schema markup to align with changes in your content and schema.org standards.
Conclusion
Adding schema markup to your website is a powerful way to enhance your SEO efforts and improve how search engines understand and present your content. By choosing the right schema type, using schema markup generators, adding the markup to your website, testing it, and monitoring its performance, you can easily implement schema markup and reap its benefits. Whether you’re a seasoned webmaster or a beginner, schema markup is an essential tool that can help you stand out in search results, attract more clicks, and ultimately drive more traffic to your website. By following the steps and best practices outlined in this guide, you can add schema markup to your website with ease and unlock its full potential for your SEO strategy.


Kyle Roof is a Co-Founder & Lead SEO at POP, SEO expert, speaker and trainer. Kyle currently resides in Chiang Mai, Thailand with his family.